
How to Extend OXID eShop With Modules (Part 1)
How to Extend OXID eShop With Modules (Part 1)
Whenever you want to extend the default functionality of an OXID eShop, you should look for existing modules, this may save you a lot of time. In case no module meets your demands, the fabulous OXID API allows you to code your own module.
Given that all program files of OXID eShop Community Edition are non-encrypted and directly accessible PHP or template files, you could potentially modify and extend existing code. Even though this might seem to be the easiest way to go, you should avoid that at any cost concerning all PHP files contained in the default distribution.
There are a few quite convincing arguments to avoid messing up the default source code:
- When installing updates or patches, various PHP files could be replaced and you‘d need to redo all your changes.
- You won‘t be able to reuse your modifications in other instances of OXID eShop.
- You‘ll soon lose track of your changes and further changes might corrupt your whole shop.
To avoid this you should encapsulate all changes in one or multiple modules.
Understanding OXID modules
Before I show you how to write a module, we should first explain the term „module“ in relation to OXID eShop: We call a module all extensions of model, controller or view classes, as well as newly written classes located in the doc_root/modules/MYMODULE folder form. A single module can have multiple functionalities and multiple purposes, but regarding above mentioned points 2. and 3., you should keep modules quite atomic.
OXID eShop is being developed with strict object orientation in mind. Hence, you should be familiar with object-oriented programming, if you’d like to develop an OXID module.
A module for custom rating
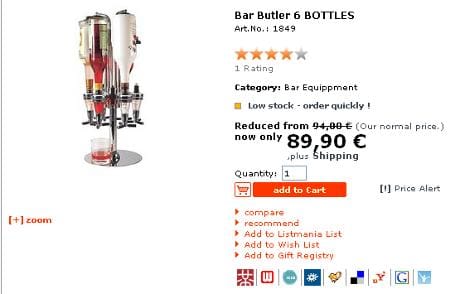
Let’s start with an easy example: We want to extend the default article rating functionality of the eShop which looks like this:
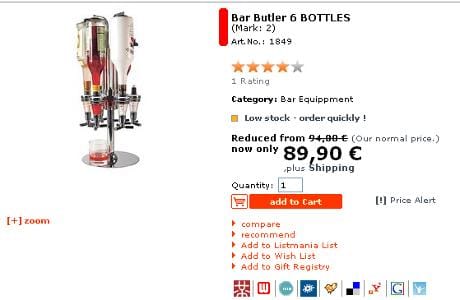
The new module is supposed to change the default rating functionality by displaying the ranking of an article according to German school marks. That means that „1“ will be the best and „5“ the worst grade. The end result of the module development I’ll walk you through is supposed to look like this, with the German-style rating displayed right below the product name:
The following sample code has been developed with OXID eShop Community Edition version 4.0.1.0.
First of all we create a directory for our module in doc_root/modules/ that we’ll label ourmodule/.
2. Create a module class
Inside of doc_root/modules/ourmodule/, we create a file called extendedarticlerating.php and put the following code into it:
<?php
class extendedArticleRating extends extendedArticleRating_parent
{
}
What we did here in terms of object oriented programming patterns is that we created an child class for the article object. The article object’s core class is called oxArticle and can be found in doc_root/core/.
3. Register the module in OXID eShop
Now we need to tell OXID eShop that it should use the new module. Therefore we open the shop admin and go to Admin Area -> Master Settings -> Core Settings -> System -> Modules.
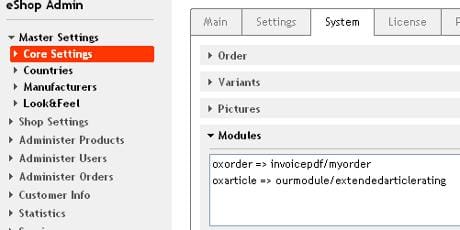
There we enter in the modules form field „oxarticle => ourmodule/extendedarticlerating“ and save that entry. Now the module is registered and loaded.
Why must a module be registered within OXID admin? Experienced PHP programmers know that in a normal context the class directive extends extendedArticleRating_parent would lead to an error when initializing the PHP code because the referenced class called extendedArticleRating_parent does not exist. But once we made the entry in the admin area, the OXID eShop framework will automagically generate a class called extendedArticleRating_parent. Furthermore, in every place where an oxarticle instance is generated within the shop it will now be an instance of extendedArticleRating which is a child object of the core class oxArticle.
4. Add module functionality
The new module still does nothing, because functionality is missing. So we add this class method within extendedarticlerating.php:
public function getArticleSchoolMark()
{
if ( $this->oxarticles__oxratingcnt->value > 0) {
return abs(6 - round( $this->oxarticles__oxrating->value, 1));
} else {
return „-“;
}
}
5. Call new module functionality in templates
You can now make use of the oxArticle object available throughout OXID eShop to run your custom module function by calling
$myArticle->getArticleSchoolMark()
Try it and modify the doc_root/out/basic/tpl/details.tpl file and change the following line of code next to the title
<h1 id="test_product_name">[{$product->oxarticles__oxtitle->value}] [{$product->oxarticles__oxvarselect->value}]</h1>
to that:
<h1 id="test_product_name">[{$product->oxarticles__oxtitle->value}] [{$product->oxarticles__oxvarselect->value}] </h1> (Mark: [{$product-> getArticleSchoolMark()}])
Now have a look at the details page of any product as displayed in the screenshot above. If you can’t see any changes or if you get an error message try to empty the doc_root/tmp folder to clear the object cache and template cache.
Remember that after a fresh installation there are no votes for any article yet, so you might want to login first and vote for an article to see something different then „-“ for the rating.
What will be next in part 2 of this howto?
You just wrote your first OXID eShop module – congratulations! In part 2 of this blog series, we‘ll extend this module and go deeper into the OXID eShop module system. I’ll give you more details on how the OXID eShop framwork can help you when writing modules.
Watch out this space for part 2 and if you have questions, feel free to ask by commenting to this blog or in the modules forum.